Thursday, February 07, 2008

Hello & a recipe for Makhni Dal

Hi everyone. This is L here and I am finally taking my first step into the world of food blogging!! A big thank you G - both for introducing me to food blogs and encouraging me to start writing myself.

Food back at home in India has been predominated by Punjabi and Tambram cuisine as my mom and dad belong to these two regions. Also as the family moved every few years to different places, my mom had the opportunity to sample and try make regional specialities in her kitchen. In short, I had a lot of fun eating a whole variety of yummy dishes (and now making them too) and through Vyanjanaa I want to share my experiences and recipes that have been given to me by my mom and extended family and recipes that are the result of experimentation [that's where G comes into the picture :)]

And moving on to today's recipe - Makhni Dal, this is a dish that my Mom makes during the winter months. It is wholesome, warming and delicious. With the prefix makhni attached to it, one would immediately start thinking about the oodles of butter and fat that one would expect to see in the dish, but surprise, surprise !! The only fat in the dish is the really miniscule amount of oil that goes into a tadka. Another surprise element - this dal does not use any of the dry masalas normally used in Indian cooking.


Ingredients:

Whole black urad dal - 1 cup
Rajma - a handful
Onion - 1 large
Tomatoes - 2 small
Garlic - 6-7 cloves
Ginger - 2 inch piece
Green chillies - 6-7
Jeera - 1 tsp
Heeng - a pinch
Milk - 1 cup
Salt - to taste
Oil - for tadka

Method:

(1) Soak the two dals together overnight in about 4-5 cups of water.
(2) Grind the onion, tomatoes, ginger, garlic and green chillies into a smooth paste.
(3) Pressure cook the dals until one whistle.
(4) Add the ground masala paste to the dal. Pressure cook for one whistle. Lower the heat to the minimum and cook for 20 minutes. At the end of 20 mins, switch off the heat and let the steam release from the cooker by itself.
(5) Do the heeng-jeera tadka and simmer the dal until it starts thickening.
(6) Add the milk and simmer again for about a minute.
(7) Add salt to taste.

Garnish with coriander and ginger juliennes.

Couple of points - the proportion of onions must always be more in the paste compared to the tomatoes, its always better to use fresh ginger and garlic for this recipe as these are the major flavour contributors and do not cook the dal too much after adding milk as it tends to split.

The dal goes well with naan, parathas and jeera rice. I love coriander chutney as an accompaniment. Refer to G's two-minute ginger pickle, it works well too. The dal is a little time consuming, but the results are totally worth it.

Tuesday, January 01, 2008

Happy 2008 everyone!

DSCN1263


I hope everyone is doing well and looking forward to the new year! I have been MIA for sometime. There were some not-very-good reasons for that but I am now returning to blogging refreshed and full of ideas. Thanks a lot particularly to Shyamala for not only trying my recipe but also giving me a gentle nudge to re-join the blogging world!

Part of my blogging hiatus was because I started watching my carb intake and I was having a hard time dealing with it. I had always thought that my vegetarianism and sugar aversion ensured that I ate healthier than most people. It was only when I started controlling my carb intake did I realize how restricted my diet was - too much carbs and too little protein. It took quite a bit of time and effort to, essentially, restructure my life (no potatoes!!! arghhhhhhh! what does one eat?!). I feel better for it and I did manage to loose some unwanted pounds before the.........wedding.

Which reminds me - I am married now! It was a wonderful experience and surprisingly, a whole bunch of fun. I was definitely not looking forward to the rituals etc........particularly since my mother had decided that instead of taking a subset of common rituals from 4 regions (Rajasthan, UP, Punjab and Tamland!), we would do EACH and every ritual from each and every region!!! Still, I survived, had amazing fun and totally reconnected with my extended family. Also, I discovered that things that you covet are not necessarily for you (toe rings, anyone?).

I begin this year by blogging about a simple lunch that we ate today. It is spicy and wholesome and very protein-eous (word?). Black chickpeas, stuffed baby brinjals, rice with peas, corriander chutney and yogurt. The 'kala chana' curry was wonderful and filling and so instead of the usual second serving of rice, one automatically went for the second and third serving of these.

For the chickpeas:
Black chickpeas----------------1 cup (soaked overnight, drained)
Oil ---------------------------1 tsp
Cumin seeds--------------------1/2 tsp
Heeng (asafoetida)-------------1/4 tsp
Green chillies-----------------4 (slit length wise)
Corriander pwd ----------------1 tsp
Tumeric pwd -------------------1/2 tsp
Red chilli pwd-----------------1/2 tsp
Tamarind paste-----------------1.5 tsp (dissolved in warm water)
Salt

1. In a pressure cooker, heat oil and sputter the cumin seeds. Add heeng, wait 30 secs, add green chillies, wait 30 secs, add the black chickpeas.
2. Add the powders & salt, saute 30 secs, add 3 cups water. Close the pressure cooker and give 3-4 whistles until chickpeas are tender.
3. Open the pressure cooker, put the burners on low and stir in the tamarind paste. Give a boil to the dish, garnish with fresh cilantro and you are ready!

A note on consistency: In many north Indian homes, this chickpea dish eaten with a thin-ish gravy which is what you will get if you follow the proportions above. In other homes/on other occasions/depending on accompaniments, you can reduce the amount of water so that you have a thick gravy wrapped around the chickpeas. This is especially good with puris/chapattis.

This dish is a great go-to dish for large gatherings (almost everyone I know has happy memories of eating this during Navratri!) and its an amazing stew to eat for lunch (along with a hunk of whole wheat bread).

On this note, I would like to introduce two new things to you.

1. A new theme: Nutritious, vegetarian, home-style, mommy-based Cooking For One. As you know, I have had issues cooking for just myself particularly wrt not wasting stuff, eating healthy, eating a variety of things etc and this year I will focus in particular on this issue.

2. A regular, guest blogger! L is a grad student, an avid eater, a HUGE helper and totally game for any crazy cooking adventure that I suddenly throw at her! She will be a regular contributor here. Also, she eats sugar........so some sweet recipes might be coming up!

2.1 S (the husband) took umbrage that I did not invite him to blog here. So you might see him lurking around too. But seriously, having seen him through grad school..............i am a doubter.......... :)

Wednesday, August 08, 2007

HAPPY BIRTHDAY! And a Request finally fulfilled - TAPORIA/BESAN MIRCH

Hi everyone! This is G reporting from India where plenty of eating and experimenting has been indulged in the past few weeks. However, the rains have disrupted my internet connection hence the delay in posting. I hope all of you are doing well and are ready to wish me and the blog Happy Bday.

Yes, yes. The B-day was 29th July. But remember the rains. And I have been soooooo late in responding to S's very patient request for the recipe below that I guess I was well served when I missed the JFI after my own heart - chillies! I guess its only fair.......

DSCN1188
(Taporia served with Rice and Masoor Dal)

TAPORIA / BESAN MIRCH

This is one dish that I absolutely love and that I think epitomizes Rajasthani cooking - simple ingredients, short cooking time and immense flavor and heat.

As I have mentioned in an earlier post, this dish has also been one of my Waterloos - neither did I manage to get the taste right, nor the texture. This time I made it in front of Great-Aunt Shiela (as opposed to her talking me through it over the phone) and then I tried it again at home. I am pleased to announce that the taste is SPOT ON! The texture could use some work, though.

Ings:

Green Chillies - 4 large (large, not very spicy variety)
Oil - 1 tblsp
Mustard seeds - 1/2 tsp
Cumin seeds - 1/2 tsp
Heeng - 1/4 tsp
Besan/gram flour - 1 large tablespoon

Powders:

Corriander pwd - 1.5 tsp
Red chillie pwd - 1 tsp (adjust this to the hotness of the green chillies. The idea is to attain a balance of flavor and heat)
Amchur pwd - 2 tsp (again, the more hot the green chillies, the more amchur can be put to ameliorate the heat)
Haldi - 1 tsp
Saunf pwd - 1 tsp
Whole saunf - 1 tsp
Salt - to taste (efficacy of Indian salt is different from that of salt in the US so I wont hazard even a guess)

Method:

1. First, take besan in a vessel with a thick bottom and dry roast over a low flame till the color of the flour has changed (see pic) and a raw smell has gone (say 5-7 mins). Remove besan from the vessel. While this is happening you may cut the green chillies into large chunks.
Hint: The besan starts burning in a flash. So you cannot leave it unattended for long. Constant stirring may be needed.

DSCN1171
(Roasted Besan)

2. In the same vessel, heat oil, sputter the mustard seeds. Then add cumin seeds and heeng. Saute for 30 seconds. Add the green chillies and step away (this thing splatters like crazy). Maintain your safe distance, add 2 table spoons of water and put a lid on the vessel.
DSCN1175
(Green chillies after cooking for 3-4 mins)

3. After 3-4 mins, remove lid and add all the powders. Dry roast for a bit. You can add another 2-3 table spoons of water to make sure the spices are done.

4. After 3-4 mins, add the roasted besan and stir. Any residual water that is left will be absorbed by the besan. Keep on flame for 30secs-1 min until everything is fully incorporated. Serve
DSCN1189
In 15 mins you have a delicious side which uses the most minimal and common of ingredients. Thats what I call cooking.

You may wonder why it was so hard for me to make it all this time - well as you can see from the pic above the texture of my dish did not come out right even this time. The main problem was when and how much of water is to be added (in the current attempt I have added too much water). If you add too much......its a gooey mess. Too little means nothing is cooked and fully incorporated. For your reference I am also posting a picture of the 'perfect' taporia below made by great-aunt Shiela.

BesanMirchi
(The Perfect Texture)
This dish may take a little time to master but its a wonderful, quick side to keep in ones arsenal for those days with nothing much in the fridge and Rajasthan on the mind.
Btw, there is something else also that has kept me busy over the past fews weeks in India. I am getting married in November and my mom has been dragging me around on endless rounds of shopping. This despite the fact that she has been preparing(i.e. shopping) for this for years!

Which brings me to a question: Were any of you driven MAD by all your wedding preps? Most of my appalled reactions to the preps are along the lines of " Are you crazy spending so much money?!" or "I would rather die than sit on a stage!" or "How cheezy!" !! Is that just me? Or were you too like that? I havent attended an Indian wedding in about 10 years so I really have lost perspective on the entire wedding circus :)

Thursday, July 05, 2007

Bad Girl Round Up

Its been a long long time since I posted anything. I have been cooking new things a lot in the meantime but somehow, the camera, the laptop and I were never in the right place at the right time together. Plus the last parts of the Spring semester are always really hard and time-consuming. So I took a bit of break....and welcomed my brother for a visit! So its been a hectic and fun time the past month. We rushed through the East Coast, have been back on MO for the past few weeks and are off to India in the next couple.

I have been reading all of the blogs that are bursting with new recipes and interesting ideas! I started visiting the local farmers market and marvelled at the freshness of the veggies (they last twice longer in the fridge), I discovered a great (though pricey) all-natural store in town, I ate at a wonderful all-vegetarian(!) south-east asian restaurant in NYC (Gobo is the name, if you are visiting NYC), I failed at making Bitman's no-knead bread (any tips?), I excelled at frying tofu (thanks to Barbara), I hosted two barbeques and 3 dinners..................phew!

Here is a list of the high points of the past 2 months cooking. I am not posting the entire recipes....just the source's that I adapted from and the changes that I made.

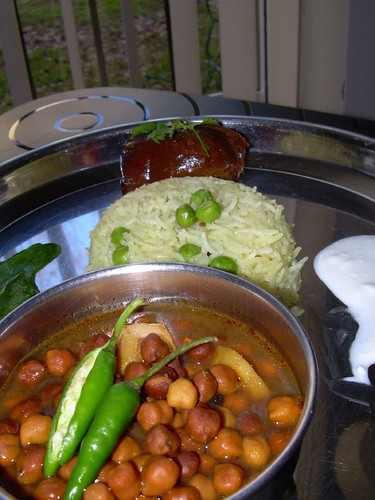
Early Summer BBQ: Farm-fresh zucchini, Eggplant, Green peppers, Onions and Tandoori cauliflower. I marinated the cauliflower in yogurt, ginger, garlic, garam masala and salt - was relatively successful. Any tips about grilling cauliflower?

DSCN0819

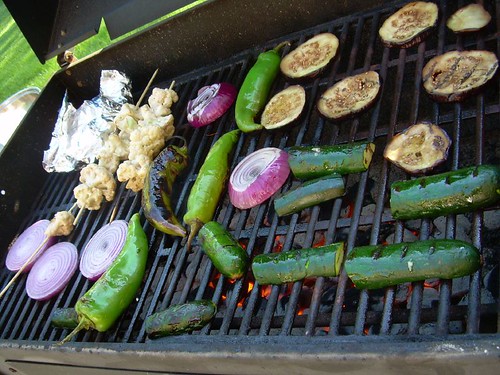
One thing not in the picture was wildly successful - grilled portabella mushrooms marinated for 2 hours in am emulsion of dijon mustard, honey, soy sauce and olive oil. The paste coated the shrooms and gave a really lovely, crunchy, slightly burnt crust when grilled (10 mins, high heat).

Grilled Strawberries!!!
DSCN0820

They were wonderful! I washed, thoroughly dried the berries, removed the leaves and threaded them on skewers. A little brush with butter (salted butter actually tasted better), 5 mins on the dying embers of the grill and serve with whipped cream and/or mascarpone cheese. My new absolutely favorite dessert - soft, light and not too sweet.


Ina Garten's Lemon Cream Sauce - very versatile and insanely easy.

DSCN0775

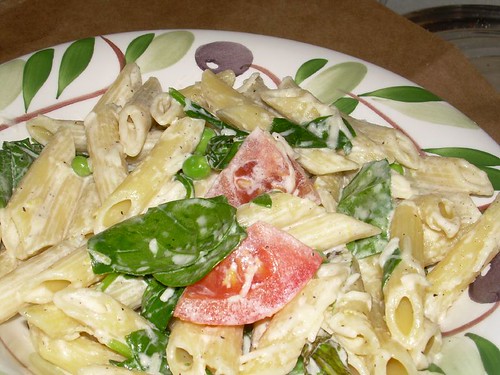
This is a keeper recipe. The cream may make one slightly wary but you can put in any amount of veggies in this to ameliorate your conscience!

Try 1: Used baby spinach (not arugula), normal tomatoes (chopped in large chunks). I also added some basil leaves (roughly torn) and mint leaves on top of everything, right before serving.
Try 2: A zinger - while the garlic was infusing into the olive oil I also added some (ok, a lot) red pepper flakes. I think it adds another dimension of flavor: cream, lemon, heat.......can you ask for anything more?

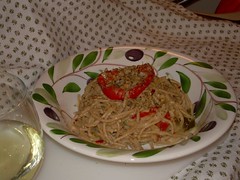
Orzo with Oven-grilled veggies and a light, mint-cream sauce.

DSCN0838

This was Try 3 of the basic lemon cream sauce (above) but with half the amount of sauce. Since I didnt have any spinach or basil or arugula I tossed orzo with the cream sauce and slightly crushed mint leaves. And oven-grilled veggies, of course. I think this is light and healthy summer dish. Plus it has the advantage of helping me use up all those tiny amounts of veggies that somehow always get left over (eye's rolling).

Asian Adventures! Tofu stir fry

DSCN0817

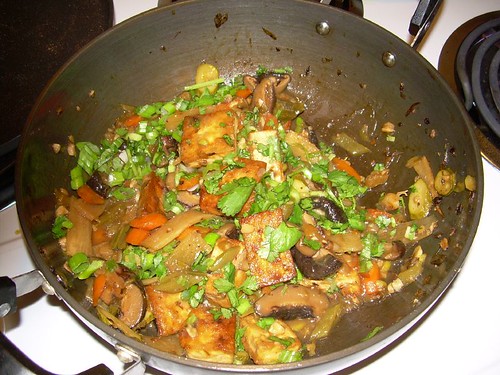
Its prolly stupid to be excited about a stir fry dish but it took me FOUR tries and a long long post from Barbara of Tigers and Strawberries to finally be able to shallow fry tofu!

Learning curve:

1. I learnt that sesame oil handles better if you drizzle tiny amounts over nearly-cooked dishes, rather than in a hot, smoking wok.

2. Thanks to Barbara I think I will also use shallow fried tofu in Indian dishes though till now I have thought it a very bad sub for Paneer.

3. Another lesson: In my grocery I found small packets of mixed veggies in various combos (not in frozen section, they were near the fresh veggies) which are PERFECT for stir fry's. I usually dont like to 'waste' packaging by buying small servings but these are perfect cooking for 1 or 2 people and when you do not want to buy huge bunches of carrots, large zuchinis and pounds of snow peas! Particularly if you are capricious like me and do not want to see the same veggies again for at least 2 weeks :)

4. New & exciting ingredient in my pantry! Dried Mushrooms! They taste amazing and last long and they are very easy to use (woe be the amount of fresh 'shrooms I have shoved into the fridge, forgotten about and had to throw away!). I wonder why they seemed so intimidating before? Oh! And the recipes to use them on the back of the package are great too.

PS: The dried oyester mushrooms werent so great. Main problem was a fishy smell during the rehydration process. It is my pet peeve but may be ok with you.

Light Summer Pizza - adapted from Micheal Chiarello

DSCN0787

I wanted to try out store-brought pizza dough and this seemed like a great summer pizza. I didnt have feta cheese (so skipped it) . I used hummus made in a local restaurant (yummy!) AND my twist was to use some new ings.........I raided the grocery store salad bar for olives, sun dried tomatoes and capers. I dont usually use these ings and so it seemed wierd buying whole jars for 1 recipe. Me thinks raiding the salad/olive bar is great idea to use new ingredients without having to buy them.

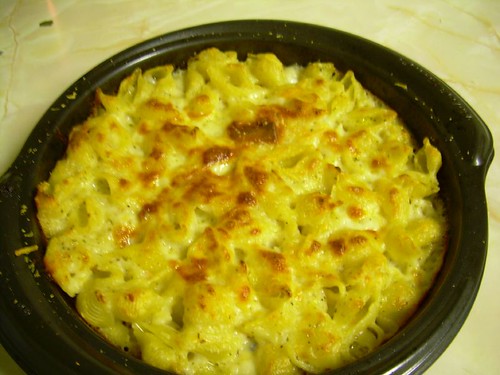
The last sinful entree! Three Cheese Mac and Cheese

Why, you ask...why this heavy comfort food in the middle of summer. Well readers, I wasnt well for pretty much the entire month of May. Nothing major, nothing urgent.....just dull, gnawing malaise. Horrid!
This version of M&C was inspired by Ina Garten (as you can see, I have been a model TV viewer!). And I have to say, a combination of cheese (rather than the normal cheddar) makes a world of a difference. I am a huge fan of comfort food but after three bites of mac and cheese, I am already bored....and looking around for condiments. Well, you wont need any with this version.

DSCN0841

Ings:

Basic Bechamel sauce---------------- 1 cup (see my recipe here)
Assorted cheese----------------------1 cup.
I used a not-so-gourmet store brought mixture with mozzarella, cheddar and .....something else!
Grated Romano and Parmesan --------1/4 cup
Cooked Pasta-------------------------3 quarters of box
Hot sauce (only Cholula!)-------------2-3 dashes

Method: Pre-heat oven to 350

1. Once Bechamel sauce is almost done, stir in the cheese and hot sauce on low heat. If the sauce is too thick you can use some milk to get the consistency to that of dosa batter.

2. Put a layer of pasta at the bottom of baking dish. Drizzle liberally with half the sauce. Put in the rest of the pasta and then layer with the rest of the sauce. Top with grated Romano and Parmesan (they gave a good crust and color).

3. Put in oven for 15-20 mins till there is a brown colored crust.


Phew! That was a long post and I hope that you enjoy these recipes and forgive me for my long sorjourn from blogging :) I promise (to try) to be more regular from now on.

Thursday, April 26, 2007

Makkai Palak


Makkai Palak
Originally uploaded by g_food.
Second time's the Charm

It prolly sounds really wierd to everyone (particularly since I am a vegetarian).....but I have not had much experience dealing with *fresh* veggies. Of course I eat veggies ....but *fresh* eating happens in India. And there, I do not have to deal with the cleaning, cutting, storage etc of the veggies. In the US, till now I have not had the time or the money to buy (particularly) fresh greens. The boxed spinach and frozen methi were good enough.......especially since I was cooking for 5-8 people.

But now I do have the money (time is debatable). A few months ago I bought a bunch of delicious and beautiful chard. Stupefied by the beauty I quickly rinsed and sauted it. The flavor...the smell.....the grits of dirt in my mouth! It was horrid! Still, I have tried to get over that and made 'Makkai palak' (Corned Spinach) with farm-fresh spinach. Only this time I remembered that farms (and hence the greens) have dirt and that I need to remove it.

So I used the great Alton Brown's trick --- wash the sink *thoroughly*, fill it with ice cold water, dunk the spinach and let hang out with occasional stirrings. Then drained the sink and ran the greens under running water for a full 5 mins, rubbing vigorously with my hands...........Excessive, I know......but realise that I have been burnt!

So here is a recipe (with due credit to Lalitha who provided crucial inputs).


Ings:

2-3 cups ---------------------very very washed, roughly chopped spinach (thawed if using frozen)
1 inch -------------------------ginger root
2-3 cloves -------------------peeled garlic
1 -------------------------------Bay leaf
1 stick ------------------------Cinammon
3-4-----------------------------Big cardamom
3-4----------------------------Green chiliies, washed and 'tail' removed

Method: Put all the above in a deep pot and put just enough water so that half the spinach is covered. Turn on the heat to medium-high and let come to boil. let the boil continue for 5-8 minutes. The lesser the water you can use, the better.

Turn off the heat and cool a little bit. Then dunk a hand blender into the same pot (deep sides useful now!) and puree away. I have also used the plain old blender for this. However, this takes away the texture of the spinach too much for my liking. But its still *totally* edible.

Once pureed, put the puree on a low flame (same pot). Add the corn. Season to taste.

In the meantime:
1/4 ----------------------------red Onion, chopped
1/2 inch----------------------ginger, cut into long, thin strips
1/2 cup-----------------------Frozen corn, thawed
1/2 tsp-----------------------Cumin seeds
1/4 tsp-----------------------Red chili pwd
1/4 tsp-----------------------Garam masala
1 tsp--------------------------Oil

Method:
*Heat oil in a small pan. Sputter the cumin seeds, saute the onion for 3-4 minutes.
*Add the red chilli powder and ginger. Swirl around. Pour this over the spinach-corn mixture.
*Sprinkle the garam masala....and some lemon juice.

Ready to eat! with sides of turmeric rice and a simple zuchinni curry

What would I have done different? Well, before puree'ing I wanted to fish out the dry spices (cinammon, cardamom). I really should have put them in a cloth bundle (or tea infuser) to save some time.

I was watching Emeril the other day and he demonstrated a really great way to clean leeks. Made me think that one of the intimidating (bok choy!) things about using fresh (and unfamilar) veggies is that you dont know
a. how and what part to wash?
b. which part to use? and for what?

I realise that this sounds very stupid. But it is true for me. So it would be great if we can share ways and methods to clean, cut and store fresh veggies as well as recipes.

Saturday, April 14, 2007

Pasta Bechemel


Pasta Bechemel
Originally uploaded by g_food.
To Long breaks, New beginings, Less Dishwashing and Emeril - I have conquered my Waterloo!

Hi folks! Its been a long time since I posted anything. I was a regular reader and commentor during this time. But somehow, posting seemed.......an effort. So I thought it would be better to wait until I was ready.

Whats been happening in the meantime? Tons and tons of cooking and exploring new territory. In fact I conquered one of my cooking Waterloo's -- white sauce. Thanks to Emeril for providing the inspiration and THE trick to get good Bechamel sauce everytime.

It began as a simple evening meal (which I also wanted to eat for a light-ish lunch). So I boiled some pasta and made some sauce. Excited by the success (!) I completely forgot about the vegetables. Routed around in the fridge for veggies (peppers, mushroons, zuchinni and garlic)......oh no! I would need another pot to saute them!

Inspiration in the form of an oven. I decided to roast the veggie in the oven and now I am not sure whether I will ever saute them again. So here's how it goes.


Ingredients:

Red bell pepper--------------half, long slices
Mushrooms ------------------ 1 big portabella, long slices
Zuchinni ------------------------half, long slices.
Garlic ----------------------------3-4 cloves
And anything else you fancy. I tried this with red onions and that worked great too.

Lay out some foil on a baking tray. Put in the veggies, drizzle with olive oil, salt and pepper. Hold the foil like a sack and give a few shakes to distribute everything evenly. Then unfold the foil flat on the baking tray, put veggies in one layer. Pre-heated oven 400F, 10 minutes (sometimes 15). Thats it.

Sauce:

Milk+cream --------------- half cup (in any ratio that you want, can be 1:0)
AP Flour -------------------2-3 big spoons
Olive oil--------------------half tsp
Bay leaf -------------------1

1. Set the milk-cream mixture on low heat on one burner with the bay leaf in it.

2. On another burner, put the olive oil and the AP flour, and keep stirring the flour. Now according to Emeril, the time you do this varies with the kind of sauce you want. A 'blond' Bechamel roux will need 2 sips of wine/beer/water to get done (while the duration is a bottle of beer for a gumbo).

3. Now grab a WHISK -- nothing else will do. Steadily pour the warm milk-cream mixture into the flour, whisking continuously. Once fully incorporated you have ---------Bechamel!!!!

Put together:
Mix the sause with cooked pasta and your oven broiled veggies. Season carefully since you already seasoned the veggies. Some fresh basil and you are good to go.

FAQ: So WTF was it so hard for G to do all these years?
Ans: After many many trials with this method, I think there are 2 keys tips. First, the temperature of the milk-cream should be similar to that of the flour. If not............LUMPS! Secondly, only a WHISK can be used to make this. Believe me, a wide variety of kitchen instruments were tried and none worked. This was the first time that I had an actual, legit excuse to buy one more kitchen thingie!

Btw, the creation was so good that I was able to circumvent my natural tendency to "Indianify" -- no cumin, dry red chillies, green chilliesm Maggie hot and sweet etc.

My exploration has now taken me into Oriental territory. Inspired by Barbara of Tigers and Strawberries (as well as by the bottle of MSG that I smuggled in from India), I have been trying out Chinese dishes.

Oh and btw, MSG..........not so bad. Latest research says so, NYT said so and Mom (scientist) said so.

Friday, March 16, 2007

व्यंजा में आपका स्वागत है!

Here's to blogger in Hindi. Hope other langauages come soon.